


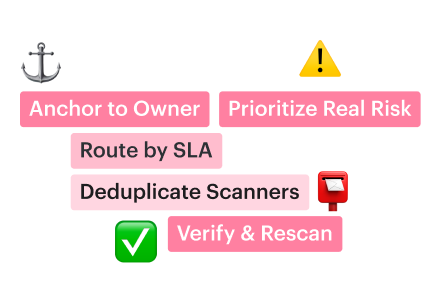
Vulnerability management best practices are the operating habits that turn scanner output into verified risk reduction. The work starts with a current asset scope, then uses exposure, exploitability, and business criticality to set priorities. Ownership and remediation SLAs move findings into action. A re-scan proves whether closure is real.
The common failure is not an empty scanner. A program produces thousands of findings but cannot prove which exposed assets matter now. Its queue also hides who owns the work and whether yesterday’s “fix” survived verification.
Datadog’s 2026 State of DevSecOps study analyzed tens of thousands of applications. After runtime exposure, exploitability, and reachability were considered, Datadog reported that only 18% of initially critical vulnerabilities should retain that rating. This is vendor research, not a universal benchmark. Still, it demonstrates why raw severity makes a poor remediation queue.
This playbook uses five operating phases: identify, prioritize, remediate, verify, and report. Across cloud and on-prem environments, the difficult part is keeping those phases connected. This playbook pairs each practice with the mistake it fixes and the signal that shows whether the program has matured. For organizations with several business units, visit our enterprise vulnerability management operating model.
Key insights
- A full scanner queue proves activity, not control. Effective vulnerability management is visible in in-scope coverage, remediation time, SLA adherence, and re-scan-confirmed closure.
- Build the remediation order from context. CVSS supplies technical severity. Exposure, EPSS, CISA KEV status, asset criticality, and exception state should shape operational urgency.
- Ownership begins when a finding enters the queue. Resolve ownership promptly, but do not delay the policy-defined SLA start while ownership is being repaired.
- Ticket closure is workflow evidence. A re-scan or equivalent technical check must confirm that the vulnerable condition has disappeared from the affected asset, image, or dependency.
- The weakest operating signal sets the program’s maturity. Strong discovery cannot compensate for permanent exceptions, recurring CVEs in base images, or fixes that nobody verifies.
What effective vulnerability management looks like
Take ten findings marked Closed last week and rebuild the evidence chain for each one. I want to see five things: the affected asset, the prioritization reason, the accountable owner, the remediation record, and the verification result.
If any link is missing, the ticket is closed. The vulnerability may not be.
That is a harder test to game than a backlog chart. A scanner can report 100% coverage of its configured scope while an unconnected account never enters the denominator. Severity can lead the queue even when the affected asset is stopped and private. Jira can show a status of Done even when the vulnerable package is still installed.
I keep one asset record at the center of the cloud vulnerability management workflow. The finding may move between the scanner, security team, service owner, and ticketing system. Its context and evidence should not reset at every handoff.
Here is what I expect from each stage:
- Identify scope before findings. Compare expected accounts, subscriptions, projects, clusters, and hosts with what was actually discovered and assessed. Scanner totals mean little without a denominator owned by the program.
- Build a defensible fix order. Start with severity, then add exploitability, exposure, business criticality, exception status, and the available remediation path. The output should explain why this item moves now.
- Route work to the team that can change the asset. Attach the current owner, SLA, ticket, and required action. A shared security queue records the problem. It does not establish accountability.
- Verify the asset, not the ticket. Re-scan or re-inspect the affected host, image, package, or dependency. Closure requires evidence that the vulnerable condition disappeared or the approved compensating control is active.
- Report where the loop is failing. Track coverage gaps, backlog age, SLA misses, exceptions approaching expiry, and findings reopened after verification. Scan volume belongs in the supporting detail.
The NIST enterprise patch management guide puts verification inside the process, alongside identifying, prioritizing, acquiring, and installing patches. That final step matters. A completed patch job records an action; inspecting the affected system shows whether its condition changed.
My operating rule is simple: no owner, no accountable action; no re-scan, no closure. When the ten-record sample fails that test, I fix the handoff before I trust the dashboard.
Vulnerability management best practices from the Cloudaware security team
This list did not start with a vendor checklist. Igor Kachurin, DevOps / Platform Engineer working with Kubernetes, Terraform, and GitOps, and Valentin Kel, Software Developer at Cloudaware, started with the places vulnerability work breaks in practice: finding intake, triage, routing, and closure.
We compared that with what Cloudaware customers run into in production, then checked the final list against current guidance from CISA, NIST, and FIRST, plus 2026 cases from other security teams.
Anything that sounded smart but did not change the work was cut. These best practices for vulnerability management are arranged by where the process usually fails: asset identity, prioritization, routing, verification, or reporting. Each one gives you an operating rule, evidence to inspect, and a failure condition to test.
| # | Best practice | The mistake it fixes | How you know it is working |
|---|---|---|---|
| 1 | Anchor every finding to an owned asset | Findings float on IP addresses or scanner records, detached from operational context | Every open finding carries an asset, environment, application, and owner |
| 2 | Prioritize by exploitability and exposure | Every CVSS Critical enters the queue at the same urgency | Ranking combines EPSS, CISA KEV, exposure, and asset criticality |
| 3 | Deduplicate across scanners | The same vulnerability on the same asset is counted two or three times | One program-level canonical finding represents each affected asset and vulnerability |
| 4 | Scan on change and measure authenticated coverage | Weekly unauthenticated scans create reassuring reports with shallow coverage | Credentialed coverage is current, while failed and missed scans remain visible |
| 5 | Tie the SLA to risk and route work to the owner | Findings age in a shared queue that cannot implement the fix | Tickets reach the responsible team with the risk tier, deadline, and asset context attached |
| 6 | Verify remediation with a re-scan | A ticket closes because someone marked the work complete | Every closure has clean re-scan evidence rather than a status change alone |
| 7 | Give every exception an owner and expiry date | Suppressions become permanent and disappear from review | Each exception returns for review before its approved risk window ends |
| 8 | Measure what leadership can act on | Reports count scans and raw findings instead of reduced exposure | Leaders can see coverage, MTTR, SLA performance, and days of KEV exposure |
1. Anchor every finding to an owned asset, not an IP
Treat the IP as a matching signal, not the asset. It records what the scanner saw, but not which workload or team owns the risk. Before triage, resolve the finding to one current CI and add its application, environment, exposure, lifecycle state, and owner. Those fields determine routing and SLA.
The matching order I use is straightforward:
- Preserve the source, finding ID or CVE ID, IP or hostname, and first- and last-seen times.
- Match stable keys first: provider resource ID, agent or instance ID, then hostname. Use IP plus time only as supporting evidence.
- Add the application owner, environment, exposure, approved exception, and ticket status.
- Send ambiguous, stale, or terminated matches to CMDB data repair, not remediation.
The scanner remains the source. Cloudaware Vulnerability Management relates its record to CMDB asset, application, and ownership data used for routing.
Finding-to-asset mapping and routing context
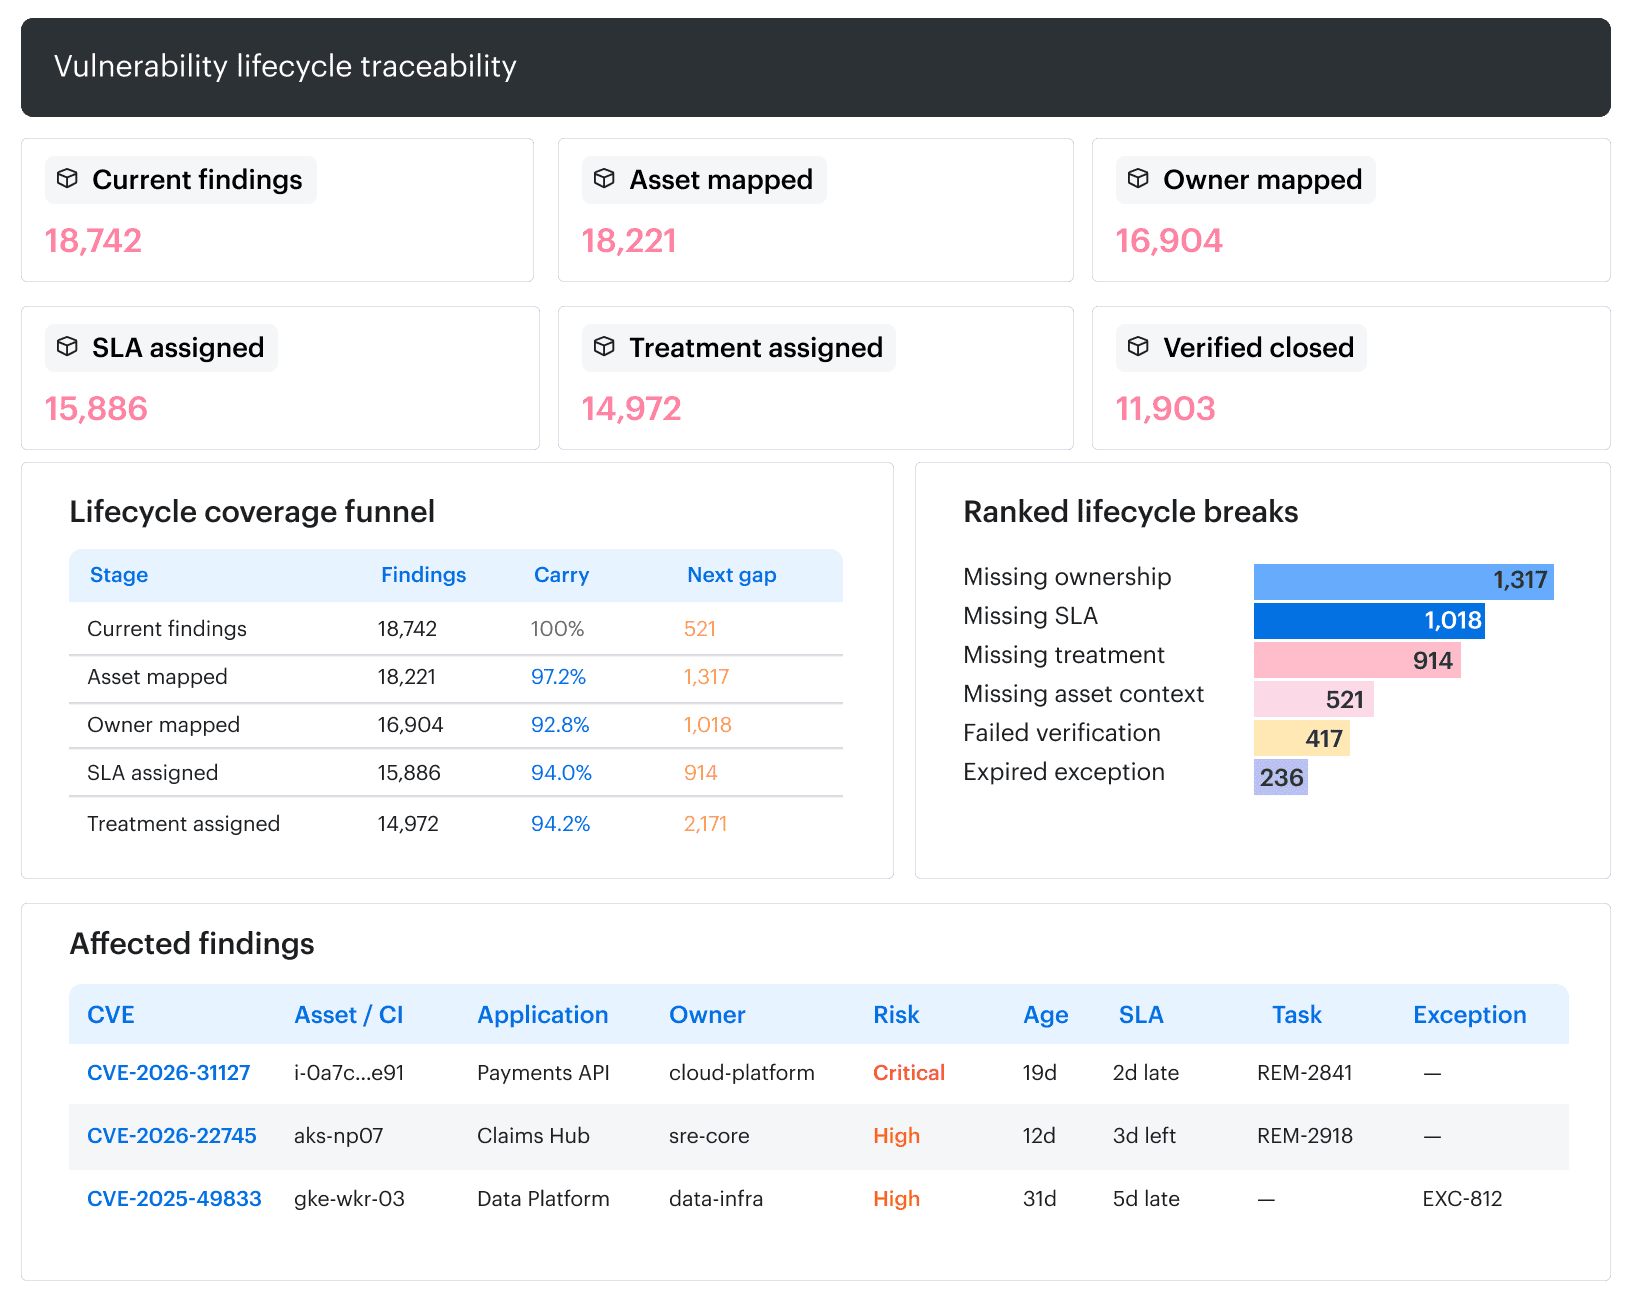
Supplied dashboard linking findings to assets, applications, owners, SLA state, tasks, and exceptions.
Only a current 1:1 match enters remediation. For example, finding-18472 | 10.24.8.17 | 10:42 UTC becomes i-0abc123 | payments API | production | internet-facing | Team Falcon. That is routable. A CI terminated at 10:42 UTC goes to relationship repair instead. The dashboard exposes the decision; it does not repair the relationship or vulnerability.
Track match coverage and route-ready coverage. Every triage-ready finding needs one current CI and one accountable team. Everything else needs a named repair queue and an age.
2. Prioritize by exploitability and exposure, not CVSS
Risk-based prioritization should rank the finding on its asset, not the CVE in isolation. A CVSS Base score describes intrinsic severity. Local reachability, deployment state, and service criticality still need to be established for the affected asset. That is why a 7.5 on a public payment API can outrank a 9.1 on an isolated test host.
I use this sequence to build the remediation queue:
- Prove the affected instance. Confirm the vulnerable version, current finding, and an active or reachable component. Missing evidence belongs in validation, not the remediation queue.
- Put observed exploitation first. A CISA KEV match or direct threat intelligence takes precedence. Otherwise, use EPSS to separate more likely targets from the long tail.
- Test reachability. Check the attack path, authentication, network controls, and whether vulnerable code can actually be reached. A public IP alone is insufficient.
- Set the SLA from consequence. Environment, asset or application criticality, data sensitivity, technical impact, and compensating controls determine the final tier.
EPSS needs one guardrail. FIRST defines it as a global 30-day forecast, not an asset-level risk score, and sets no universal cutoff. Never multiply EPSS by CVSS; the result has no interpretable meaning. Calibrate the threshold to sustainable remediation capacity, then apply local context.
Datadog’s 2026 study analyzed tens of thousands of applications and dependencies. It concluded that only 18% of initially critical vulnerabilities should remain critical after runtime exposure, exploitability, and reachability are considered. Its scope is application security, but the operating lesson transfers: severity narrows the backlog; context orders it.
At scale, the order must remain explainable after scanner and asset data meet. Once configured, findings are related to CMDB records in Vulnerability Management, then the manager can compare exposure, environment, application, and criticality in one cohort. EPSS and KEV remain external enrichment, with source and refresh time visible.
Open vulnerabilities by application and risk band
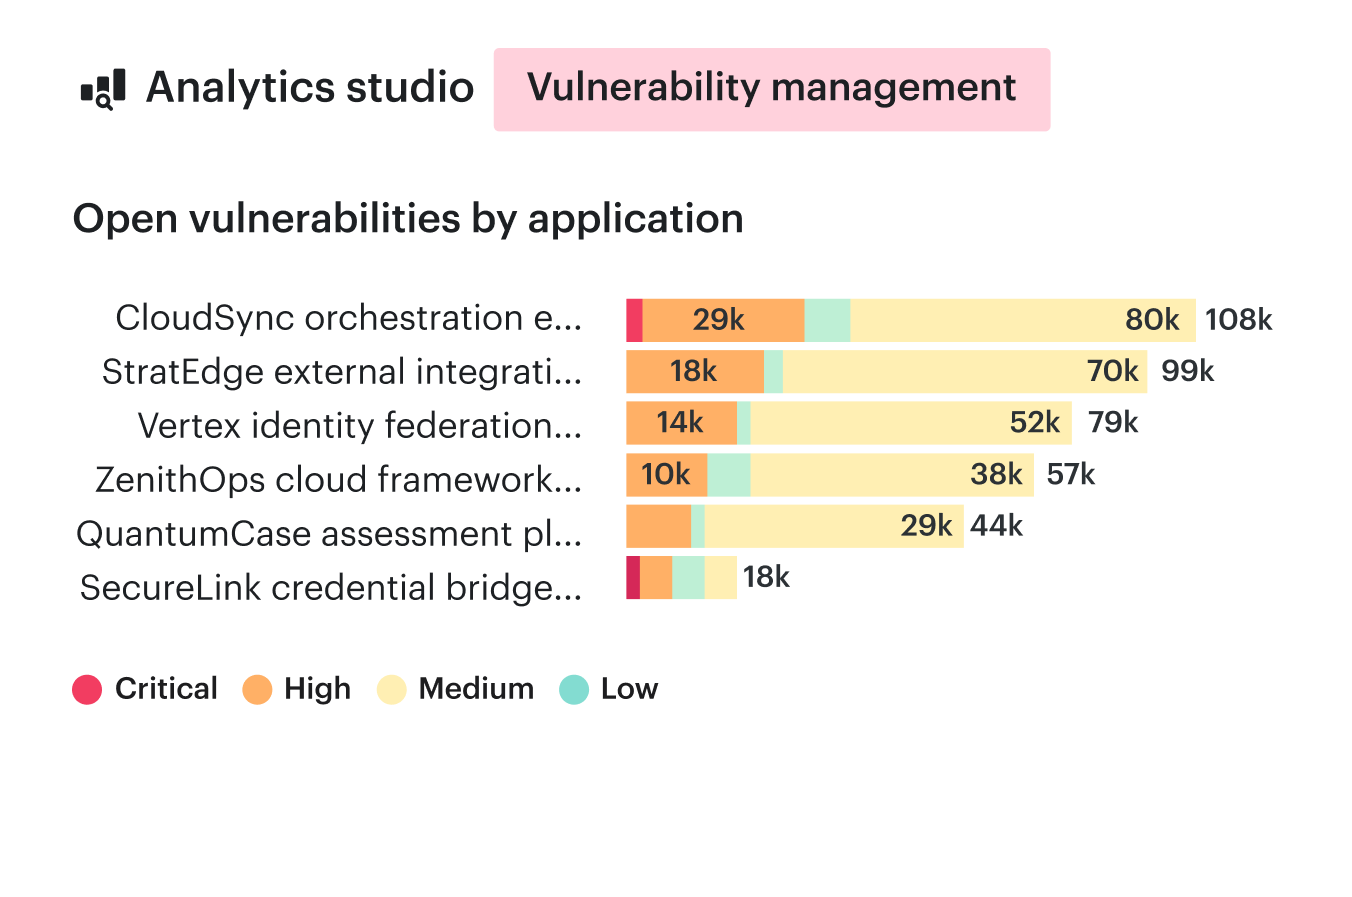
Application-level risk distribution supplies portfolio context; it does not show the CVSS, EPSS, or KEV comparison in the example.
The test-host finding is downranked, not suppressed. It keeps an owner and due date while the exposed payment API moves first. After changing the rules, audit both ends: the highest-priority cohort and deferred high-CVSS findings. Every row must expose its evidence, reason, owner, and SLA. If the dashboard cannot explain the order, the model is not ready to govern remediation.
3. Deduplicate findings across scanners before you triage
Deduplicate before anyone opens a ticket. Use a program-level canonical finding as the working unit: one vulnerability in one component, on one asset, during one asset lifecycle. Multiple scanner observations may support that finding. They should not become separate remediation jobs.
Keep three objects distinct:
- Scanner observation: the original Tenable, Qualys, Wiz, or other source record.
- Canonical finding: the reconciled asset, component, vulnerability, and lifecycle.
- Work item: the ticket assigned to the team that can apply the fix.
For the matching key, use a stable cloud resource ID or CMDB CI, the normalized CVE or vendor issue ID, the affected component and its location, plus the overlapping asset lifecycle. For packages, that location may be a package URL and installation path. For containers, use the image digest.
Do not let an IP address decide the match. Cloud IPs are reused, interfaces multiply, and rebuilt instances can inherit an old address while representing a different lifecycle.
Igor Kachurin, DevOps / Platform Engineer | Kubernetes, Terraform, GitOps
Here is the practical test. Suppose Tenable, Qualys, and Wiz detect the same vulnerable OpenSSL package on EC2 instance i-0abc123. The resource ID, package, installation path, and lifecycle match. Keep one canonical finding, retain all three source timestamps and statuses, and create one ticket.
If Wiz reports that CVE inside container image sha256:84f..., leave it separate. The image has a different owner, deployment path, fix, and verification step. Merging it with the host finding would conceal work.
To inspect these decisions at scale, the vulnerability manager needs scanner evidence and asset identity in the same view. Cloudaware Vulnerability Management can integrate data from Tenable, Qualys, Wiz, and other configured scanners into CMDB and change workflows. The scanners remain the finding sources; stable CI relationships and tested normalization rules determine whether their observations belong together.
Scanner aggregation and normalization recipe
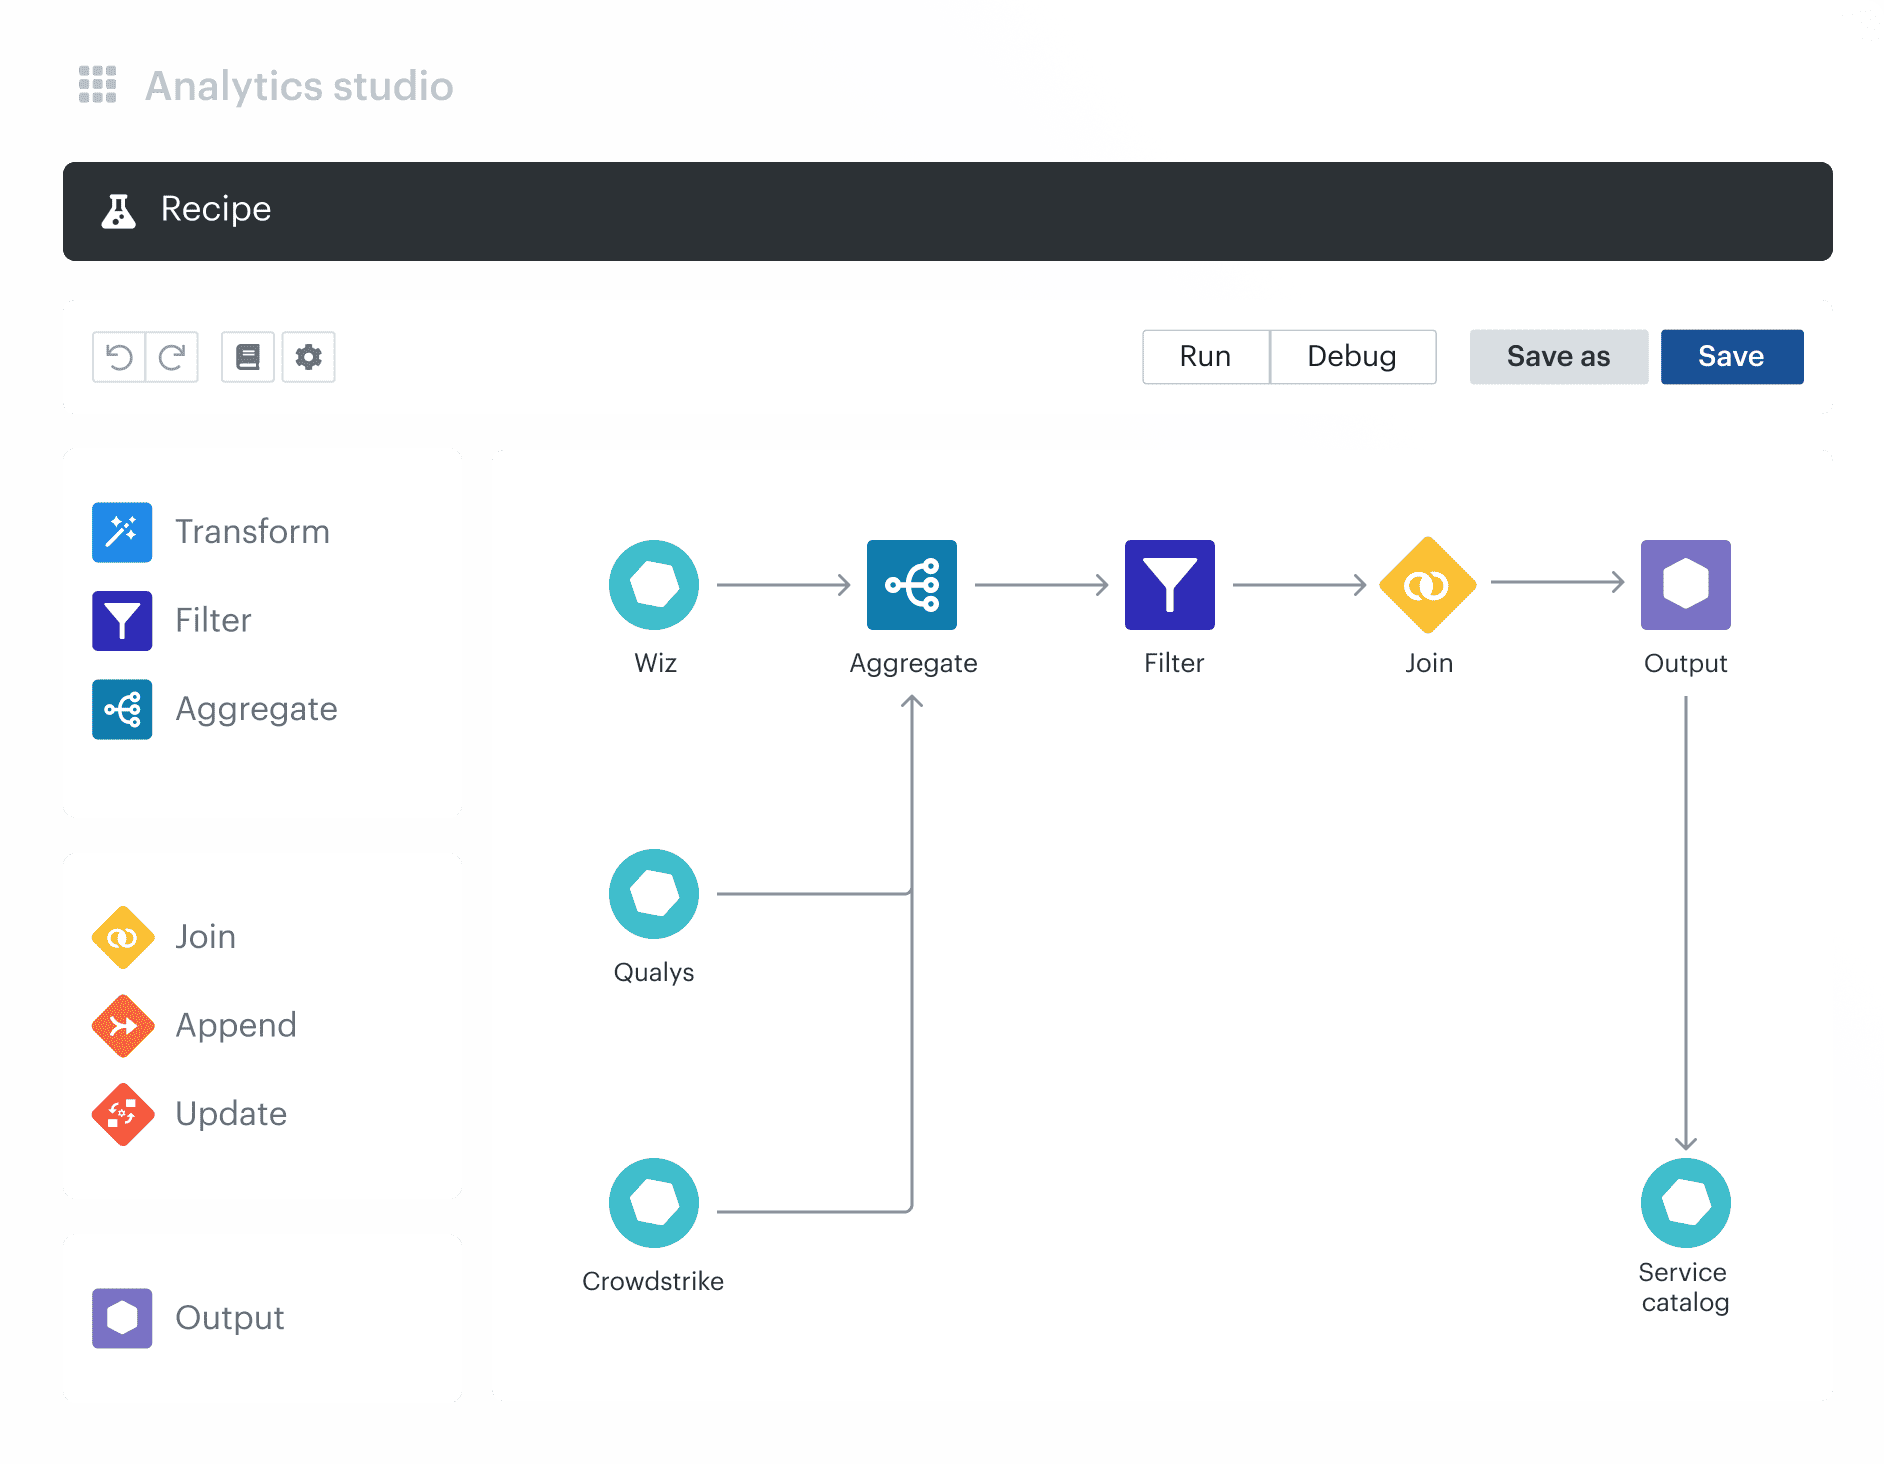
Supplied recipe showing scanner inputs, aggregation, filtering, joining, and output. Match quality requires separate validation.
When scanners disagree, keep the disagreement visible. Preserve each reported version, status, scan time, and authentication state instead of letting the latest import overwrite the rest.
Before enabling automated vulnerability routing and ticket creation, test known matches, expected non-matches, rebuilt instances, reused IPs, late scanner updates, and one CVE affecting multiple components. Treat any false merge as a release blocker. Duplicate tickets create noise; an incorrect merge can hide an affected asset.
4. Scan on change and measure authenticated coverage
Treat scan cadence and scan depth as separate controls. Cadence determines how long a new or changed asset can remain unchecked. Authentication determines whether the scanner can inspect installed packages, local configuration, and locally exploitable conditions.
A daily unauthenticated scan may confirm that port 22 is reachable. It still cannot prove which OpenSSH package is installed. NIST makes the same distinction: scanners with host credentials can extract local vulnerability data, while scans without credentials largely depend on remotely observable services.
That is why “continuous” should not become one global schedule. Define the trigger and pass condition for each asset class:
- Internet-facing or short-lived resources: trigger assessment after creation and material configuration changes. The scan must complete while the resource still exists and before it begins serving production traffic.
- Persistent hosts: combine authenticated or agent-based assessment with external network scanning. Count the host as covered only after the scanner successfully collects current package and configuration evidence.
- Container workloads: scan the image digest before promotion, rescan stored digests when vulnerability intelligence changes, and compare deployed digests with the approved scan record. Kubernetes documents why the digest matters: tags can move, while a digest identifies immutable image content.
This model also matches CIS Control 7, which treats vulnerability management as ongoing assessment and calls for both authenticated and unauthenticated internal scans. The two methods answer different questions; one should not be reported as a substitute for the other.
Consider an illustrative production record. EC2 instance i-0abc123 was last observed at 09:10. A network scan reached port 22 at 09:14, but the authenticated check failed one minute later because the assessment credential had expired. Its package inventory is eight days old.
That host is reachable. It is not currently covered for host-level vulnerabilities.
Do not send the record to the application team as a patch ticket yet. Route the authentication failure to scanner operations, repair the credential or agent, rerun the assessment, and confirm that the package inventory timestamp moved forward. Only then can a package finding enter the remediation queue with current evidence.
Igor Kachurin, DevOps / Platform Engineer | Kubernetes, Terraform, GitOps
Report the three conditions separately:
- Enrollment coverage: supported, in-scope assets onboarded to the required scanner divided by supported assets expected to be assessed.
- Authenticated success: assets with a successful authenticated or agent-based check divided by assets requiring host-level evidence.
- Freshness coverage: assets with a successful policy-compliant scan inside the assigned window divided by the eligible asset population.
A scanner may reach 99% of host IPs while authenticating to only 62%. The useful conclusion is not “coverage is 99%.” It is “38% of hosts still lack current package-level evidence.”
Those denominators require an asset inventory independent of the scanner. When configured, scanner records are related to CMDB assets through Vulnerability Management, and the vulnerability manager can compare expected assets with scanning coverage, age, exposure, environment, and ownership. Authentication status should appear only when the connected scanner supplies that field.
Cloudaware exposes the gap; the scanner remains the source of scan evidence.
Scan coverage by asset class
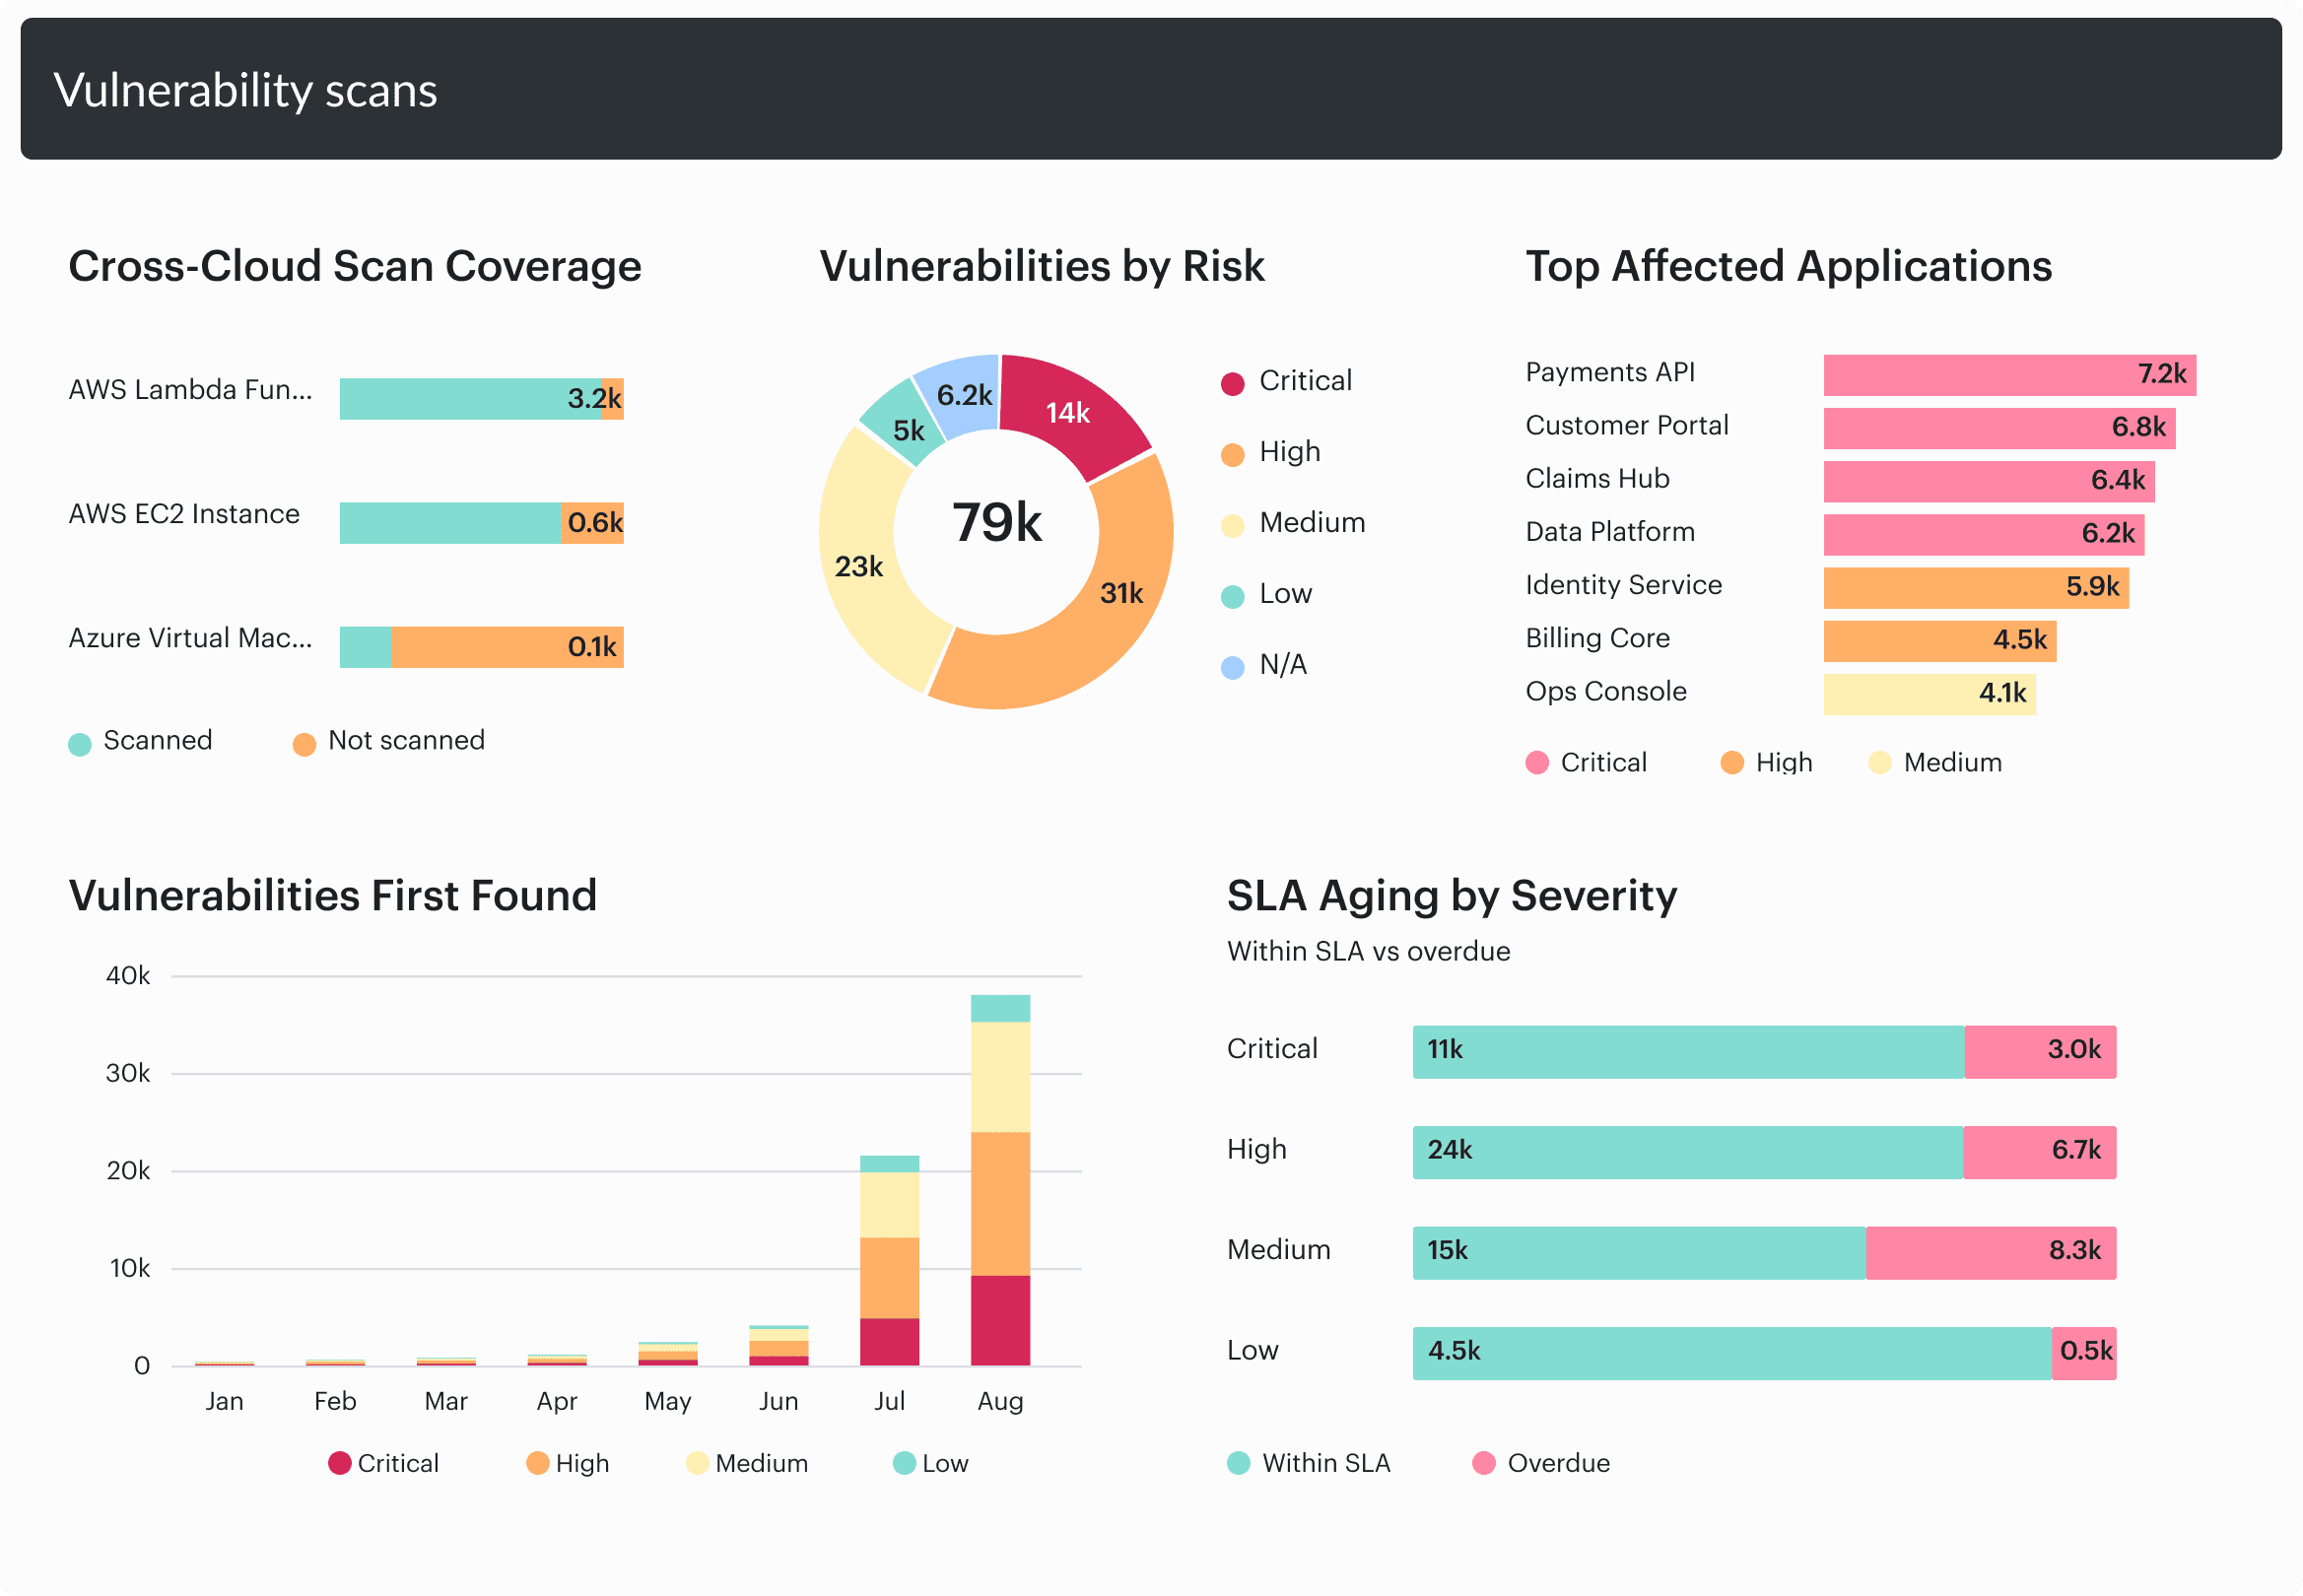
The supplied view separates scanned and unscanned resources. Authenticated success and evidence freshness must be checked separately.
Start with the authentication-failure cohort, then investigate assets with no successful scan inside their freshness window. The dashboard prioritizes the gap. Closure requires a successful reassessment with current evidence, not a cleared error message.
5. Give every finding an SLA tied to risk, and route it to the owner
If your SLA starts when Jira creates a ticket, fix the clock first. That timestamp measures dispatch, not risk age.
Across the vulnerability workflows we review at Cloudaware, this mistake appears often: a finding may spend hours or days in qualification and owner resolution, yet its SLA starts from zero when the ticket finally lands. The report looks healthy. The exposure is already older than the report admits.
Record two control points instead:
first_observed_at: when a source first detected the conditionsla_started_at: when the normalized, deduplicated finding received its final risk tier and remediation path
Track the interval between them as qualification latency. If that interval keeps growing, the bottleneck sits in asset matching, prioritization, or ownership data rather than remediation.
Separate three measurements: time to qualify, time for the owner to acknowledge, and time to verify the fix. One average remediation time will hide where the process actually stalls.
Here is how the handoff should work.
At 09:20, a scanner reports a vulnerable package on an illustrative public production payment API. By 09:27, the observation has been matched to the correct asset, checked for KEV status, deduplicated, and connected to Team Falcon through the CMDB. The organization’s Tier 1 policy allows seven calendar days, so the due date is calculated from 09:27. It does not wait for an engineer to open Jira.
The ticket reaching Team Falcon should already answer the questions required to plan the change:
| Ticket field | Illustrative value |
|---|---|
| Canonical finding | VM-2048, linked to the production payment API |
| Affected instance | Stable asset ID, cloud account, application, and environment |
| Vulnerable component | Installed package, detected version, scanner evidence, and last-seen time |
| Priority basis | KEV status, public reachability, production role, and final risk tier |
| Required action | Approved fixed version or a documented compensating control |
| SLA state | Start time, due date, current age, and escalation path |
| Closure condition | Successful verification scan followed by a renewed exposure check |
If service ownership moves from Team Falcon to Team Lynx on day three, update the assignee from the current CMDB relationship. Keep the original SLA start and due date. Reassigning the work does not make the vulnerability younger.
When the owner lookup fails, send an ownership-repair task to an accountable CMDB or platform team while the risk clock continues. Leaving the finding unassigned, or delaying the SLA until someone claims it, rewards incomplete ownership data.
By this stage, the vulnerability manager needs one auditable chain: source evidence, canonical finding, asset owner, remediation ticket, SLA state, and verification result. Cloudaware Vulnerability Management supports custom task-assignment workflows, Jira and ServiceNow ticket integrations, and dashboards for vulnerability age and remediation status. Jira or ServiceNow remains the system where the team performs and records the work.
Remediation tasks, deadlines, and Jira status
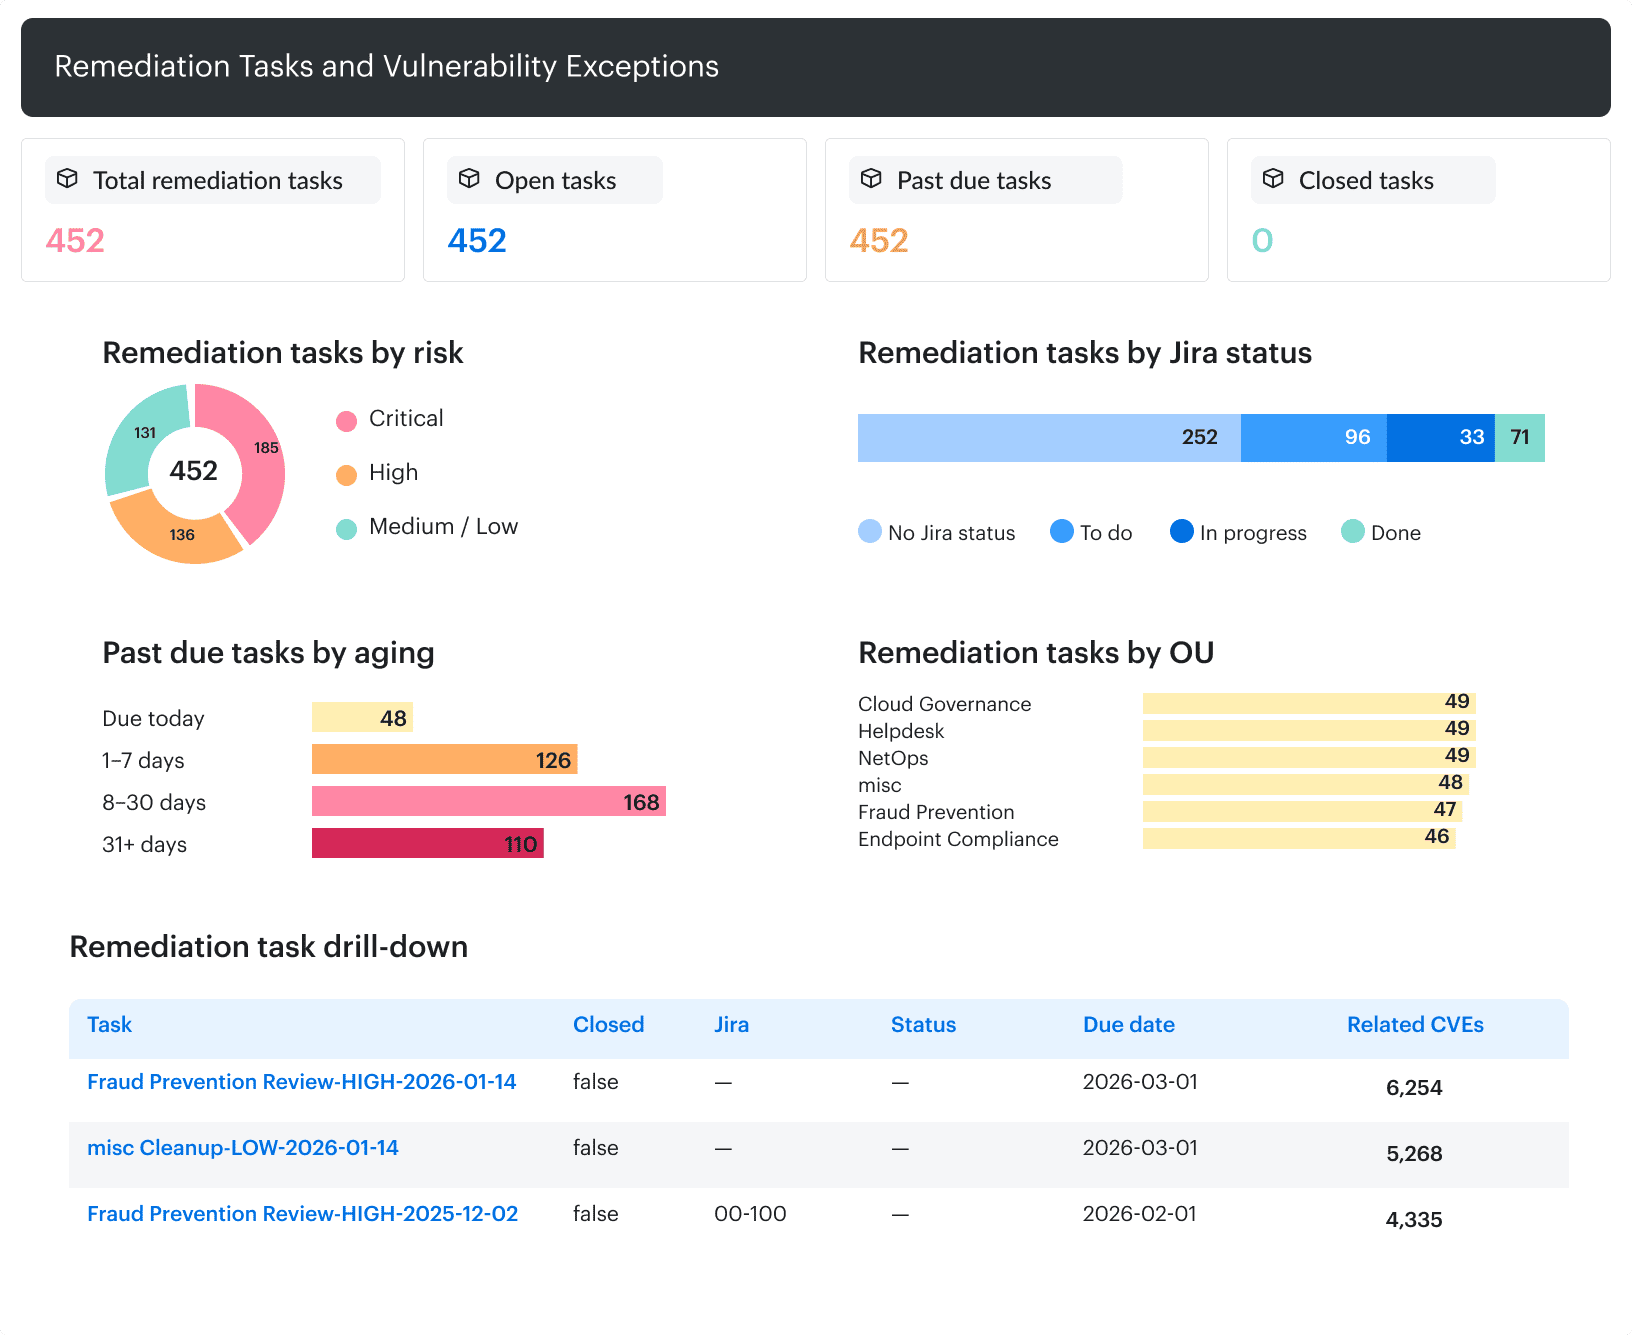
Task drill-down retains due dates, Jira references, and related CVEs. Jira Done is not verified remediation.
Use this view to locate the delay, not merely count overdue tickets. A breach may begin with slow qualification, a broken ownership relationship, stalled remediation, an expired exception, or missing verification. Each cause belongs to a different team and requires a different correction.
Valentin Kel, Software Developer at Cloudaware
Finally, generate remediation work from the qualified canonical finding, not from every scanner observation. Keep raw observations attached as supporting evidence. The owner receives one actionable record, while security retains the history needed to defend its priority, age, exception state, and closure.
6. Verify remediation with a re-scan; never close on report
Close an asset-level finding only when a fresh technical check shows that the vulnerable condition is gone. What we repeatedly see is a clean ticket queue with one or two servers still running the old package: the change reached part of the scope, but nobody verified the rest.
A deployment record proves that a command ran. It does not prove which host, package, container image, or deployment revision now exists. Before closing the finding, require three gates:
- Change recorded. Capture what changed, the stable asset ID or image digest, the deployment scope, and the completion time.
- Technical proof matched. Run a fresh authenticated scan, image scan, or agreed equivalent against the same asset and component. Its timestamp must be later than
change_completed_at, and the scan itself must complete successfully. - Disposition written. Attach the evidence source, scan run, verification time, and outcome to the asset-level finding. Use a distinct status for
verified fixed,still vulnerable,retired with evidence, oraccepted risk.
Do not let an exception disappear inside the fixed count. An accepted risk remains visible with its owner, approval, scope, and expiry date. Retirement also needs its own disposition because removing an asset is not the same as correcting its vulnerable component.
Now apply the rule to an illustrative five-host rollout. One remediation task contains five asset-level findings for the same vulnerable package. The patch reaches three servers; two sit outside the deployment group. Although the change ticket moves to Done, the fresh scan returns this result:
3 verified fixed · 2 still vulnerable · remediation task remains open
Close the three verified findings. Keep the other two active inside the same remediation task and return them to the owner. This preserves one operational handoff without pretending that every affected instance was fixed.
When the next scheduled scan is several days away, request a targeted check. With Cloudaware, teams using Vulnerability Scanning as a Service (VSaaS) can request on-demand scans for selected assets or scopes. Depending on the operating model, that request may enter a service workflow before the scanner runs. Requested therefore means that verification has entered the queue, not that it has passed.
After the completed scan no longer detects the vulnerability, Cloudaware can send that result to the existing Jira or ServiceNow ticket. Customer-configured ITSM automation then decides whether the evidence satisfies its closure rule.
Request a targeted verification scan
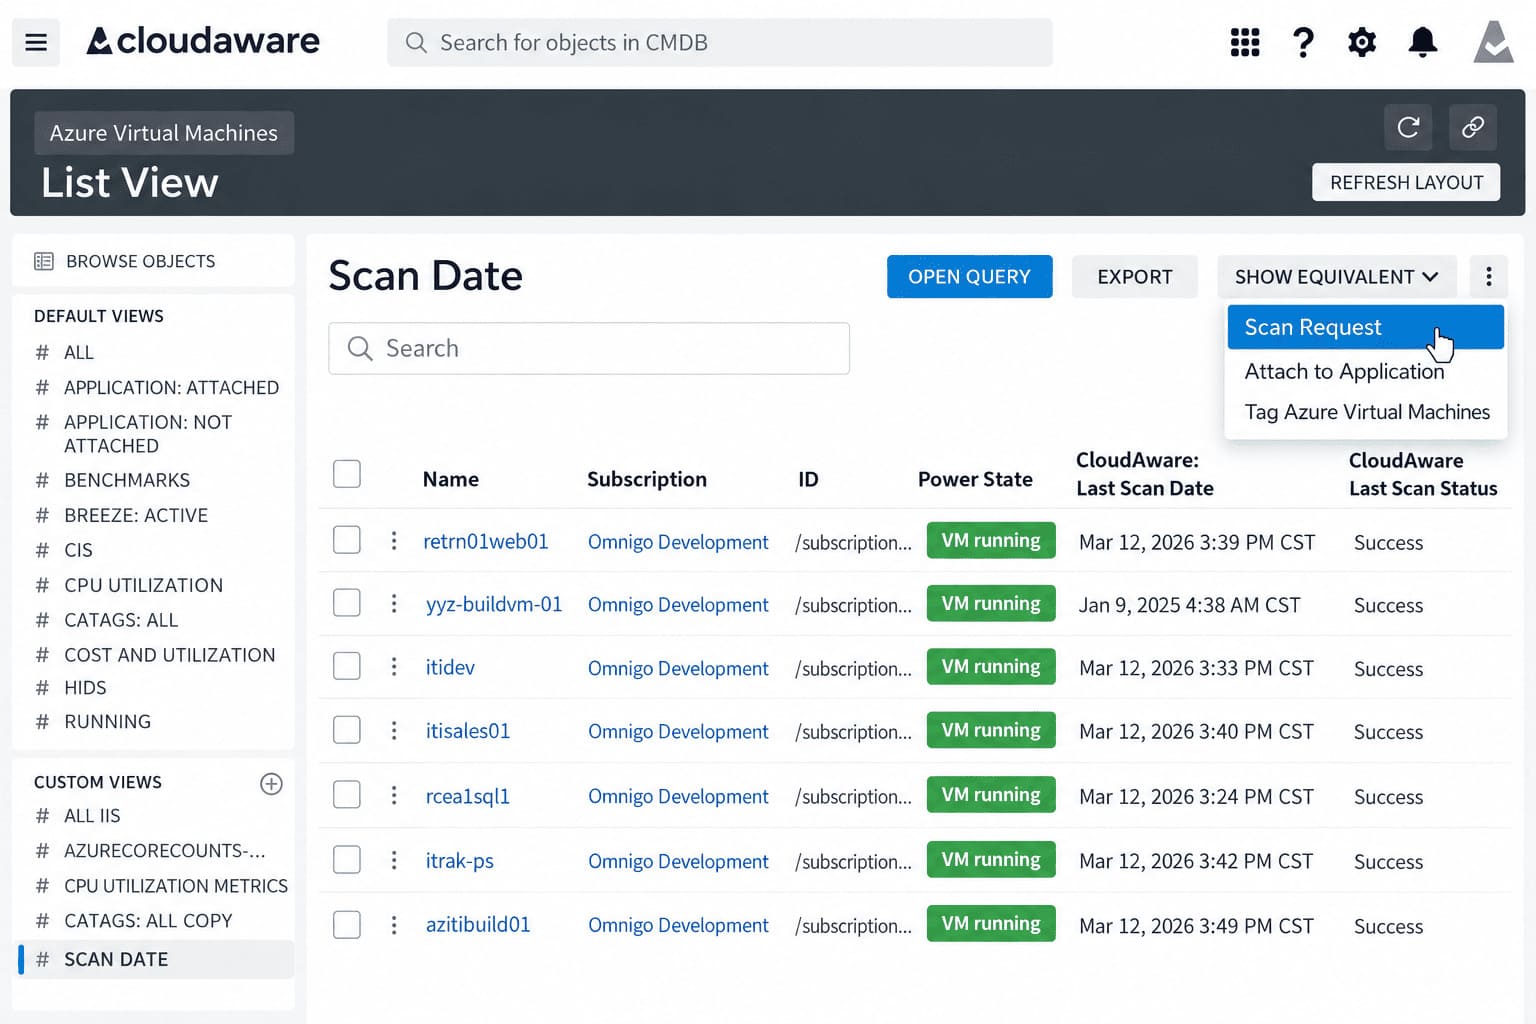
The Scan Request action starts the verification workflow. It does not prove that a scan completed or that all affected assets are fixed.
Disappearing assets require another branch. For a persistent server, a missed scan, authentication failure, or empty result leaves the finding in verification pending. Absence of evidence is not a clean result.
With an ephemeral workload, instance termination proves even less. Check the replacement image digest, launch template, or deployment revision, then confirm that no active child instance still carries the vulnerable component. If the workload was permanently retired, record a retired disposition and retain the deletion evidence rather than counting it as remediated.
Where the original scanner cannot repeat the test, define an acceptable substitute before the change begins. Authenticated package inventory or a fresh image scan may qualify if it checks the same component and version condition. A deployment screenshot does not.
Valentin Kel, Software Developer at Cloudaware
If you report mean time to remediation (MTTR), calculate it through successful verification and publish that definition. Keep the ticket’s Done timestamp as a separate field. The difference is verification lag: the time during which the workflow claimed completion but technical evidence had not confirmed it.
7. Manage exceptions with an expiry, not a permanent mute
If an exception has no expiry, the finding has effectively left the normal remediation flow. The failure becomes visible during a later review: ownership has changed, the compensating control has drifted, and nobody can reconstruct why the risk was accepted.
Treat a vulnerability exception as a separate, time-bound risk record linked to the exact asset-level findings it covers. While active, it may change queue and SLA treatment. It must not reset first_seen, mark the condition as remediated, or remove it from governance reporting.
Before approval, give the record to someone who was not in the original discussion. That reviewer should understand three things without searching through email or Slack:
- Scope: the affected asset IDs, findings, vulnerable condition, environment, and exclusions.
- Decision: the risk owner, approver, remediation blocker, compensating control, and evidence that the control actually reduces the relevant attack path.
- Exit: the review date, expiry, remediation milestone, and exact action triggered when time runs out.
Consider an illustrative legacy billing service. Twelve named production VMs carry a vulnerable package, but the vendor supports the fixed version only after an application upgrade scheduled for the current quarter. The application owner requests a 90-day exception. Security approves those 12 asset-level findings, not the CVE across the estate.
The temporary control removes direct public access and restricts inbound traffic to the internal load balancer. Security attaches the relevant network-policy ID and evidence that no public route remains. That control reduces the remote attack path; it does not remove exposure to a compromised internal workload, so the exception retains that residual risk.
- Day 0: approval starts the exception
- Day 60: formal review begins
- Day 75: the migration change is due
- Day 90: any still-present finding returns to the active remediation queue unless the risk is reassessed and approved again.
If the day-75 milestone slips, escalate and reopen the review immediately rather than waiting for expiry.
Cloudaware vulnerability exceptions are separate records linked to one or more Vulnerability Scan records. They retain scope, justification, owner, approver, start and expiry dates, and compensating controls. While an exception is active, related findings are marked as suppressed and excluded from standard SLA calculations and most remediation queues. They remain visible in exception reports and audit views. Expiry returns still-relevant findings to the normal workflow unless the exception is renewed with updated justification.
Suppression changes workflow treatment, not the security state. Preserve the original detection date and exposure age, then track exception duration separately. Otherwise, each approval makes old risk look new and accepted risk starts masquerading as remediation.
A vulnerability exception with an owner and expiry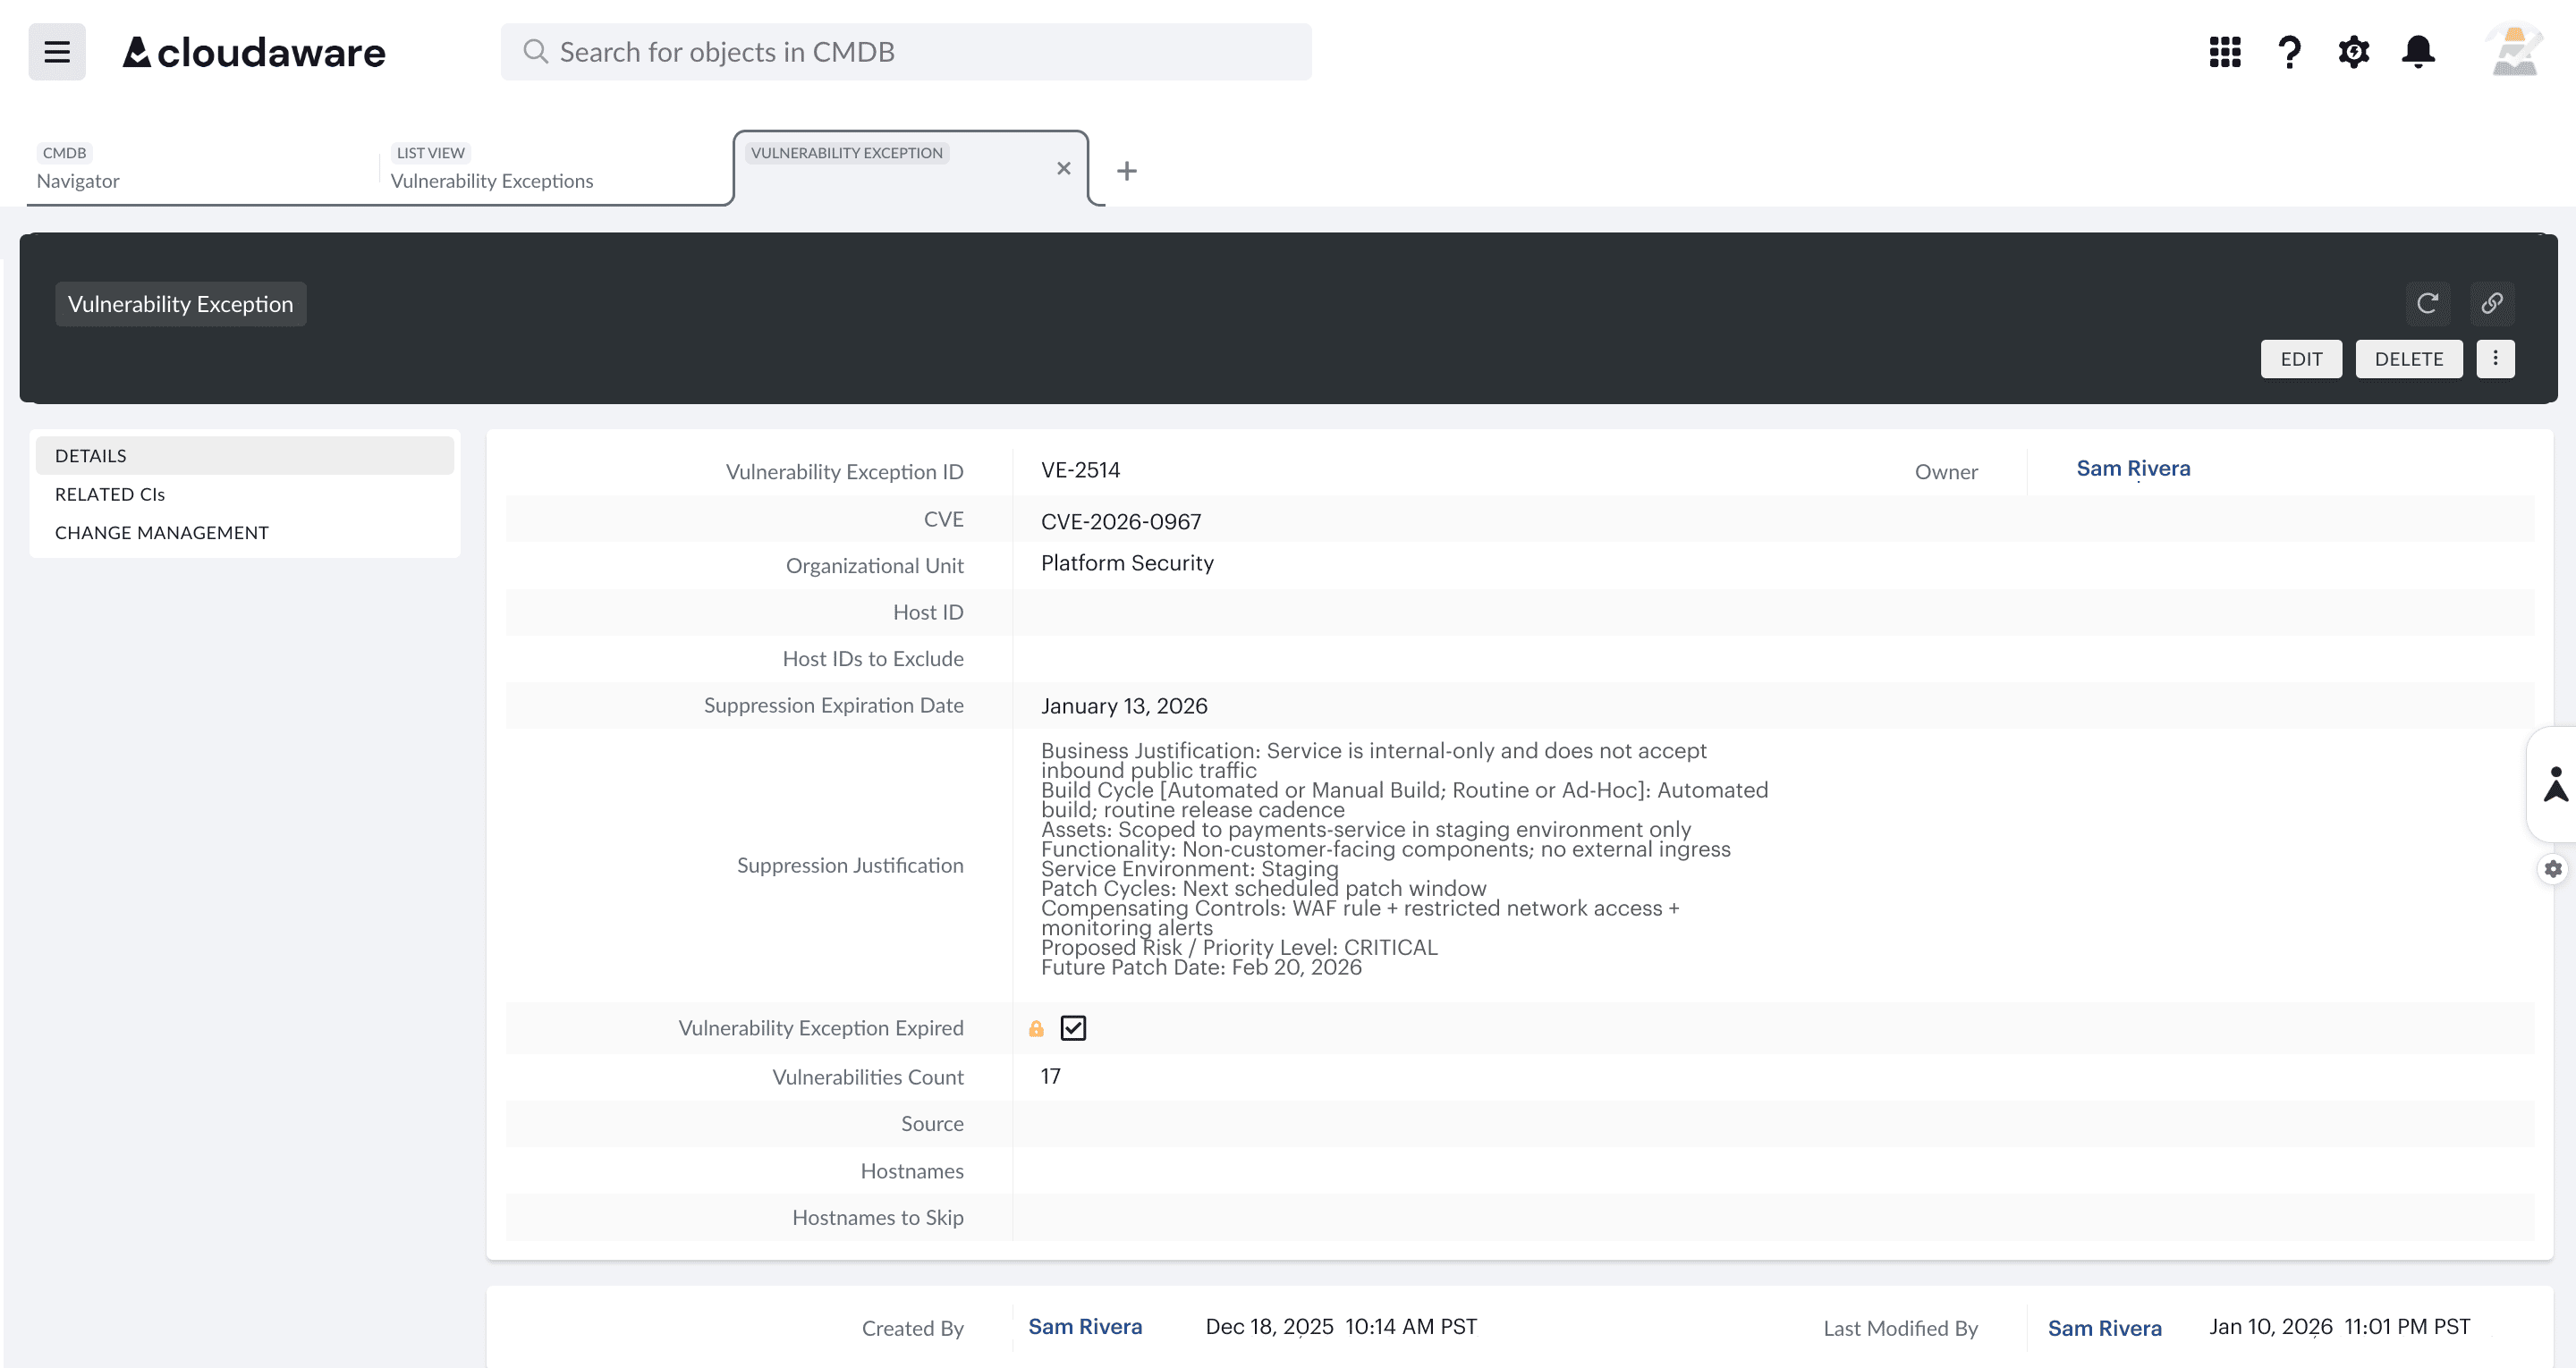 The supplied exception record keeps ownership, justification, expiry, expired state, and affected-vulnerability count visible.
Read this dashboard as deferred exposure, not as a cleaner backlog. If active exceptions are removed from SLA-breach counts, report their volume, age, and risk bands beside the unsuppressed queue. Cloudaware documents exception views with active and expired status, organizational unit, CVE, expiration date, and affected-vulnerability count.
Avoid blanket rules such as suppress this CVE everywhere or mute this scanner plugin. A new internet-facing asset may carry the same vulnerability without sharing the reviewed business context. A broader platform exception can be valid only when one owner, one compensating control, and one approval rationale apply to every asset in an explicit scope. New assets should not enter that scope without review.
Valentin Kel, Software Developer at Cloudaware
Track exception age, days to expiry, overdue reviews, renewals, findings by risk band, and the share of the Critical and High backlog currently suppressed. One diagnostic deserves its own check: findings reactivated after expiry. If expired exceptions exist, the underlying vulnerabilities are still present, and none return to remediation, the expiry workflow is not working as intended.
8. Measure what leadership can act on
A leadership metric should point to a decision: repair coverage, remove a blocker, escalate overdue work, or revisit an exception. If its only message is “we ran more scans,” keep it out of the executive view.
Four measures give leaders enough signal without turning the dashboard into a second vulnerability console:
- Policy-compliant scan coverage: Divide eligible assets with a successful scan inside their policy window by all eligible assets present at the reporting cutoff. Apply the window by asset class, and require authenticated evidence where the policy calls for it. Show the denominator and authentication failures beside the percentage. A drop should open the affected cloud account, Azure subscription, GCP project, service, and asset class. That drill-down separates connector failures from credential, agent, and scope problems.
- Verified remediation time: Do not compress the workflow into one average. Track total exposure from
first observedtoverified. Then separate qualification latency (first observedtoSLA started) from operational remediation time (SLA startedtoverified). Compare the median with the 90th percentile by final risk tier and business service. If the median improves while P90 rises, a small cohort is carrying long-lived exposure. Ticket closure does not stop either clock; successful technical verification does. - Reachable KEV exposure: Treat this as a custom program metric, measured in
finding-asset-days. One affected asset carrying one known-exploited finding for one reachable day equals one finding-asset-day. For comparisons across a changing estate, normalize it:
Reachable KEV exposure rate = reachable KEV finding-asset-days ÷ in-scope asset-days × 1,000
Use the asset’s historical reachability for each day, not its current state applied backwards. Without that history, label the result as a current-state approximation and do not claim a measured historical improvement. - Overdue exposure: Count unsuppressed active findings that have passed their SLA. Break the result down by risk tier, days overdue, business service, and current owner. Show active exceptions beside this number as deferred exposure, never as fixed work. The next action should be obvious: remediate, remove the reachable path, correct the ownership relationship, or open a time-bound exception.
Here is the normalization problem in numbers. Across two illustrative 30-day windows, reachable KEV exposure falls from 45 finding-asset-days across 7,500 in-scope asset-days to 9 across 9,000. The estate grew by 20%, but the normalized rate still dropped from 6.0 to 1.0 per 1,000 asset-days.
That comparison is defensible only if eligibility, reachability, and detection rules remained consistent. Keep the routed findings, verification evidence, and active-exception days behind the trend so an analyst can reproduce it.
Adapt the practices to cloud workloads
Cloud vulnerability management breaks down when teams apply a host-based process to infrastructure that is constantly rebuilt. The scanner queue does not represent the live estate, terminating an instance does not fix the image that recreates it, and some findings affect provider-managed layers your team cannot patch.
The following practices adapt coverage, remediation, and routing to those cloud-specific conditions.
Measure coverage against the live estate
Start with the assets that exist now. A scanner queue is not a valid coverage denominator because it contains only resources the scanner has already discovered or received.
At the reporting cutoff, join current provider and CMDB inventory to scan results using a stable asset identifier, not an IP address. Then classify each in-scope asset as:
- Current successful assessment
- New and not yet assessed
- Stale result
- Authentication failure
- Missing agent or connector
- Approved technical exclusion
Here is an illustrative calculation. The estate contains 1,240 persistent hosts; 17 have an approved technical exclusion. Among the remaining 1,223 eligible hosts, 1,116 have a current successful assessment, 76 failed authentication, and 31 are new with no result.
Policy-compliant coverage: 1,116 / 1,223 = 91.3%.
That number is only the starting point. “More than 90% scanned” hides 107 assets that still require action. Seventy-six belong in the scanner credential queue. The other 31 point to a discovery-to-scanner onboarding gap.
Cloudaware’s vulnerability data model relates normalized scan records to CMDB assets and their application or organizational context. In the coverage view, teams can then filter the failed population by account or subscription, CI Class, application, scanner source, and last scan date. The output is not another security score. It is a worklist with the correct operational owner.
Live-estate scan coverage and SLA context
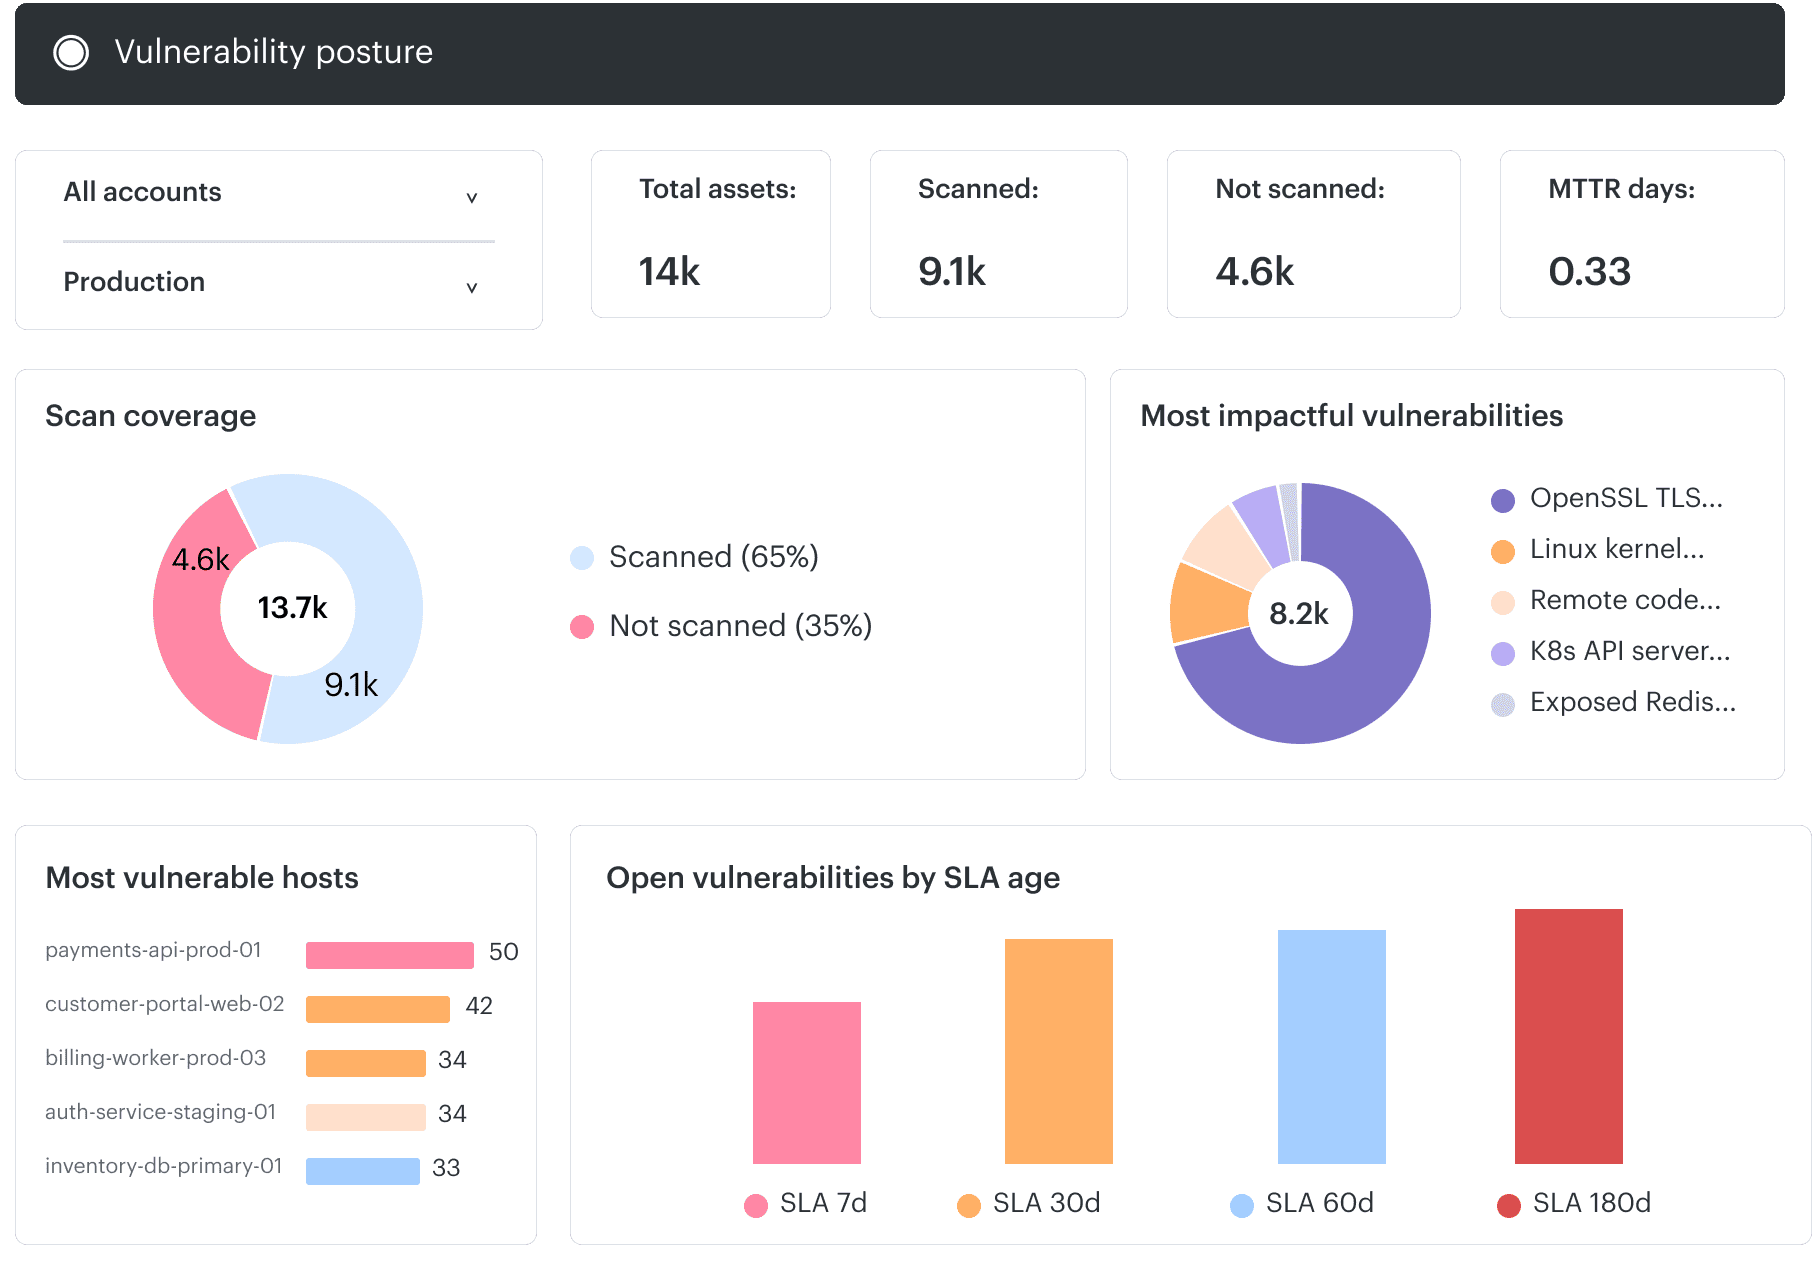
The supplied posture view shows production scope, total assets, scanned and unscanned resources, and SLA-age context.
Fix the source that recreates the workload
For an ephemeral asset, disappearance is not remediation. If the vulnerable image, AMI, launch template, or deployment manifest remains approved, the next scaling event can bring the exposure back.
Take an illustrative payment-api deployment. A registry assessment finds a vulnerable package in digest sha256:7f…; that digest is running across three clusters. Deleting the affected pods changes the asset count for a moment. The deployment controller then recreates them from the same image.
The remediation path should follow the object that persists:
EKS runtime context for an ephemeral workload
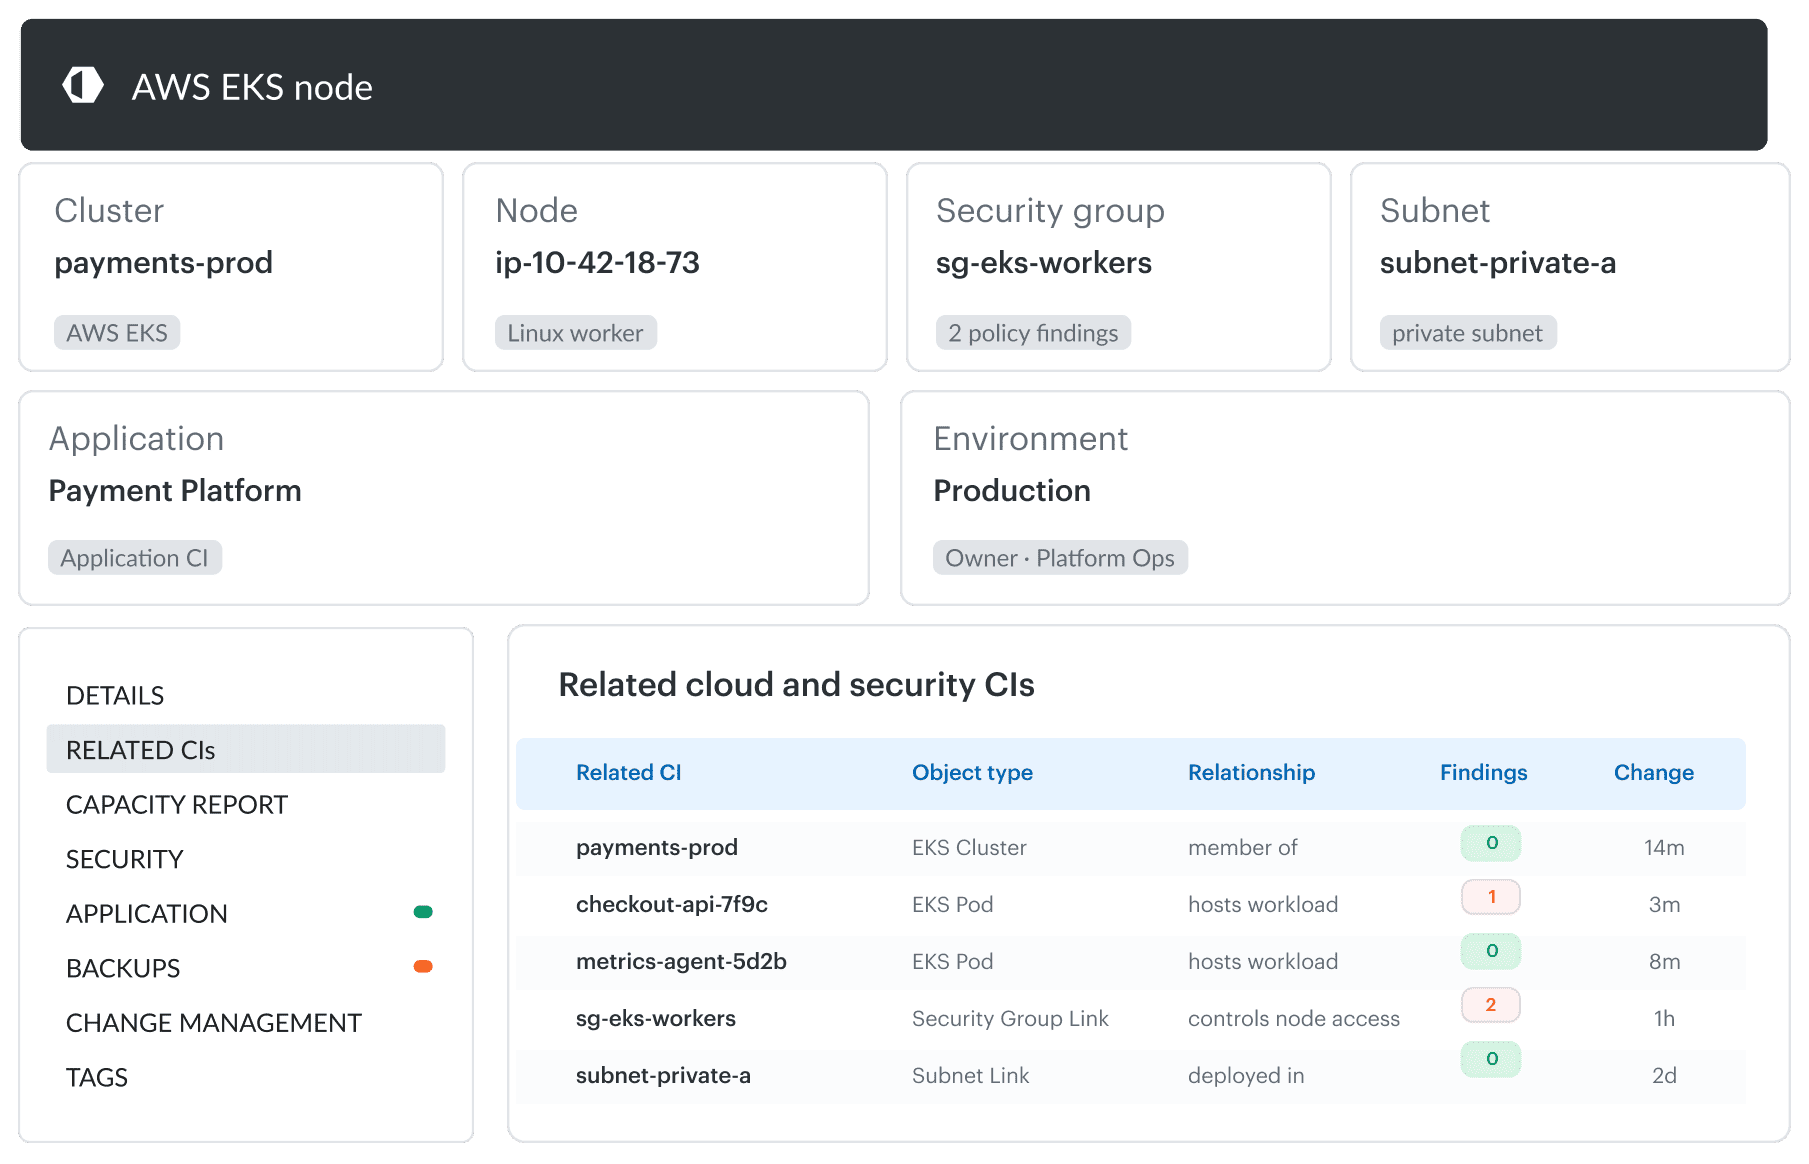
Runtime relationships identify the affected workload. Verify the image rebuild, replacement digest, deployment, and redeployment block separately.
Do not close the finding until the replacement digest is deployed everywhere in scope and the old source can no longer enter production through an approved path. This last check matters during rollback, autoscaling, and disaster recovery, when an apparently retired template can become active again.
Route the action available to the owner
Shared responsibility becomes useful when it changes the ticket. Before routing a cloud finding, identify the remediation object, the control boundary, and the action available to the recipient.
| Finding condition | Work that belongs in the ticket | What not to assign |
|---|---|---|
| Customer-managed package or configuration | Patch, rebuild, or configuration change for the named workload | A generic cloud-account ticket |
| Provider-managed layer with a customer-controlled option | Supported engine upgrade, maintenance-window change, or exposure reduction | “Patch the underlying host” |
| No direct customer action | Provider advisory tracking plus a scoped compensating control or expiring exception | An impossible remediation SLA |
A managed database shows why this distinction matters. When the affected operating-system component belongs to the provider, the application owner cannot patch it. Depending on the service, the actionable response may be an engine upgrade, removal of public access, or documented provider tracking.
Igor Kachurin, DevOps / Platform Engineer | Kubernetes, Terraform, GitOps
Together, these cloud vulnerability management best practices keep coverage, remediation, and ownership attached to the cloud lifecycle rather than a weekly scan window. Identity, configuration, logging, and data protection require separate controls; we cover them in our cloud security best practices.
Turn vulnerability findings into owned remediation work with Cloudaware
Cloudaware Vulnerability Management turns scanner observations into remediation records linked to the affected asset, application, owner, SLA, and verification status. It does not give the security team another isolated severity list. It gives them a queue they can explain and the service team work it can execute.
Consider an illustrative payment-api host. Tenable and Wiz both report the same vulnerable package. Cloudaware relates the observations to the same CMDB asset, retains evidence from both sources, and adds the context missing from the raw scan: production environment, public exposure, application relationship, and Team Falcon ownership.
With the organization’s normalization and routing rules applied, those observations become one remediation item rather than two competing tickets. Its priority reflects the asset and exposure context, the Tier 1 SLA sets the due date, and the Jira task goes to Team Falcon with the affected package and fix evidence attached. A later scan updates the same workflow with the verification result.
Finding, application, ownership, and remediation links
The supplied drill-down relates findings to asset, application, owner, risk, age, SLA, task, and exception context.
That workflow is supported by five capabilities relevant to vulnerability operations:
- Scanner data normalization. Cloudaware brings findings from tools such as Tenable, Qualys, into a shared vulnerability data model while retaining their source evidence.
- CMDB context. Findings inherit the account or subscription, application, environment, tags, exposure, relationships, and responsible team associated with the affected asset.
- Risk-aware prioritization. Severity is considered alongside exploitability, asset exposure, and business context, so a reachable production finding does not compete as an equal with an isolated development asset.
- Workflow routing. Jira and ServiceNow carry remediation tasks into the service team’s existing queue. PagerDuty can support alerting or escalation without becoming the system where remediation is executed.
- Operational reporting. Cloudaware dashboards expose scan coverage, vulnerability age, SLA performance, task status, and the underlying records behind each metric.
The surrounding systems keep their specialist roles. Scanners collect technical evidence. Jira or ServiceNow remains the workspace where the service team executes the change. Cloudaware connects those records to the asset model and keeps prioritization, ownership, SLA, exception, and verification logic consistent. It supports remediation; it does not patch an asset on the owner’s behalf.